
If you are one of the many who have run out of wall space but are not handy with a sewing machine to finish projects, I have something for you. You'll have to be brave though. . . . . it involves, Mod Podge, a glue gun and scissors. . . . . . .the first two being real no-no's in the needlework industry.
I started with a paper mache book box from the craft store. A box with a lid would work too. The "page" portion of the box was painted with a gold metallic using a sponge brush.


It's nice and shiny. :)

Measure and cut a piece of fabric that will completely cover the outside of the book. With the RIGHT side of the fabric up, coat with Mod Podge. I used a sponge brush for this step too. Allow to dry completely.

Trim much of the excess fabric away from the design you plan to mount. Coat the EXCESS edge on the back side of the design, not the design itself. You are doing this to stop any fraying and stabilize the fabric. This is the strawberry gameboard (http://www.littlehouseneedleworks.com/garden.html).
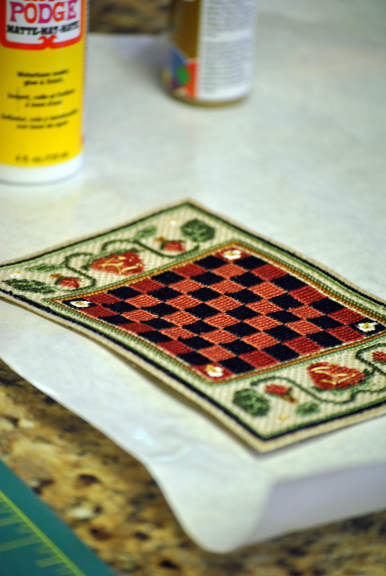
Once this piece dries, trim closely to the last stitches. I left about 1/8". The Mod Podge allowed the fabric to stiffen and there was no raveling. This is scary stuff!!! Cutting. . . . gluing. . . . . . eek!

Next, measure the width and length of the book. I used a ruler and rotary cutter to trim the fabric to fit, allowing for 1/4" turns to the inside. So whatever your measurements are, add 1/2" to each measurement.

Next step, coat the outside of the box with Mod Podge and go to work centering and pressing the fabric. Once it's in place, sponge more Mod Podge onto the inside areas. Don't worry about perfectionism. The product dries clear. It takes a while to get it all to stick. I continued dabbing my fingers into a puddle of the MP to get it all to lay down but it did. After the glue dried I antiqued the pages a bit with black paint and rubbed a bit of the gold in dry-brush fashion over the fabric. I forgot to photograph that step. Oops.

Now it's time to take your stitched piece and adhere it to the book. Again using Mod Podge, brush the edges a bit heavily but the inside of the design lightly. Center on the box and press. The MP dries rather quickly so move along with determination!

This is the last step. It includes a glue gun, probably the scariest part. Squeeze gently with a thin bead of really hot glue and trim the edge of the design with twine or other pliable trim. I left a long tail and started at the center/top so I could tie a bow. If the glue is hot it spreads nicely. If you rush it blobs out.

So here it is finished. Because this book stands, it's perfect for a bookcase. I know there are other ways of finishing a project like this. You could skip applying fabric and just paint the box or antique it. The design could be mounted to foam core to make the center more dimensional. Ahhhhh. . . .then there is the inside. Maybe we'll tackle that another day.
So many ideas. . . . so little time.

Happy Stitching,
Diane

Lovely finish Diane! I love book boxes for stashing stuff away.
ReplyDeleteVery cute, Diane! For years, I lived in a tiny apartment, and didn't have any wall space, so didn't get anything framed.
ReplyDeleteThree years ago, I bought a house with lots of wall space, and as the budget allows, I've been getting stuff framed to hang on the walls. Many of those finishes are Little House Needleworks. I would love it if you came over to my blog to see some of my recent framed finishes...
~ Susan
I found you at livingbytheshore! Wonderful photos and great stitching!
DeleteAnother creative idea of finishing ~~~ I will certainly have to try this one out! Thanks for the step by step....Nice job, Faye
ReplyDeleteSuch a wonderful idea! I am running out of space and should make something like this! thank you for sharing!
ReplyDeleteThat's very cute and a great idea! Thanks for sharing!
ReplyDeleteThanks for sharing hun; I'm gonna diffidently attempt this one...
ReplyDeleteHugs, Shar
Cute idea! I will definitely give this a try1
ReplyDeleteGreat idea! As the cover is a game board I can imagine doing (or buying?) little things you need for different games and put them inside and give it as a bday present to someone :)
ReplyDeleteThat's really cute Diane :)
ReplyDeleteOh my goodness - the book finish is adorable! Thank you so much for including the tutorial. I will be going to Hobby Lobby today to get supplies. Beth
ReplyDeleteWhat a great idea!!! How very cute!!!!
ReplyDeleteCute.I like the idea. Which pattern is that you put on there?
ReplyDeleteThat is the Fruit Gameboard pattern. . . . it comes with one depicting pears also. :)
DeleteSo pretty! Congratulation !
ReplyDeleteEmőke fom Hungary
Beautiful and so creative !!
ReplyDeleteBeautiful finish! Thanks for the finishing tips.
ReplyDeleteBeautiful finish! Thanks for the finishing tips.
ReplyDeleteGreat idea and nice instructions! How about some tiny checkers for the inside?
ReplyDeletePure Genius. Thank you so much for the instructions!
ReplyDeleteGreat finish
ReplyDeleteI love it!
ReplyDeletevery creative ....so many possibilities for this little idea....thx. Gotta get some of my finished but not framed projects out.....
ReplyDeleteThank you for the great tutorial. I use glue and hot glue guns whenever I can. I've yet to actually put glue on a piece of stitching, however...will definitely be trying that! Chris G
ReplyDelete